Sunday, August 8, 2010

Using my gifts!

I'm actually the luckiest girl I know when it comes to husbands.  I know other girls may think their husband is great, but I've never been heard of one that beats out the boy.   One of the many wonderful things he does is surprise me with gifts.  One day he found my Amazon.com wish list with me knowing.   He would find things he knew I wanted and buy them during work time at a nearby bookstore, and give it to me when he came home from work.  No special occasion, no particular reason... simply because he loved me.  What a catch, right?  One of the things I got was a book called One Yard Wonders.  It's a pretty awesome book, with dozens of easy projects.  I recently decided it was time to start putting the gift to use.  Here is the result:

A reusable grocery tote (or whatever else I want to stick in it!)!  The book's instructions were very simple, and making the tote would've been a cinch, but my sewing machine & I sometimes don't like each other very much.  I have a lot of problems with bobbins & thread tension.  Nevertheless, after and hour of taking apart, putting together, and taking apart again, the sewing machine began to work again.  And I've got to say... I love this little tote!


Thursday, August 5, 2010

No place like home...

My sister-in-law recently moved waaay across the country to Oregon for her work.  All that distance and a tiny Chevy Cobalt meant that there wasn't much room to bring everything she wanted.  That means no couch, no chairs, and basically, no cozy!  To make her new home seem a little warmer, I made this sweet little pillow.   Hope she enjoys (if I ever actually get to sending it!) 
I made the letters by cutting them from vinyl on my Cricut, sticking the negative space onto my fabric & spray painting.  After that was dry, I printed a coloring page of the state, pinned it onto some felt, and cut around the lines.  I then cut a heart shape & stitched it to roughly where her home city would be.  Next, I ironed some wonder-under to the felt and attached it to the fabric.  Then I stitched around the edges of the state.  Finally, I sewed the front & back of the pillow together, stuffed it, and stitched it shut.  That's all!  

Sunday, July 18, 2010

Craft Room Artwork (for Cheap!)


I've been wanting to put up a few more decorations in my craft computer room, but I didn't want to spend a lot of money.  Here is what I came up with!  It's really simple to make, too.  All you need is:
  • *Elmer's Glue (with a paintbrush for spreading)
  • *A decorative paper punch (I used a big circle)
  • *A picture frame with a mat
  • *A TON of paint sample chips (FREE at any home improvement store)
To start, get the paint chips.  I grabbed the Disney colors because they were the brightest.  I grabbed 3 of each color card.  Next, use to punch and punch as many of your shapes as you can from the sample.   I was able to get 3 circles f
or each sample.   Then, separate your circles by color family (all the pinks & reds together, all the yellows & oranges, etc.).  Finally, glue them down (overlapping) to the frame back, making sure to only place them where they will show through the mat.  Here is a close up of one of my colors: 


Here is another neat way to use paint chips. I may just like it because I'm a teacher, but whatever!  I found it on a blog called Serving Pink Lemonade.  They've got a bunch of really cute stuff there!


Saturday, July 17, 2010

Yard Sale Finds

Just a quick photo of some recent yard sale finds.  Can't lie... I kind of love them!!
I out the scale in the kitchen with my basket of fruit on top.  The owl thing is a trivet.  It's nice because I have a thing for trivets, and I have a thing for owls.  Put it together & what have you got?  A find just perfect for me!

Wednesday, July 14, 2010

Long-term project

I mentioned in an earlier post that I was practicing a pinwheel quilt square with a pot-holder.  It all stemmed from a beautiful quilt that I saw on the blog V&Co (one of my absolute favorites!).  I got some really great charm-pack fabrics called Hello Betty by Moda to create one of my own.  The patterns remind me of 30's era flour sack fabrics.  Here is my start:

What I didn't realize was exactly how much work this is going to be.  I really want this quilt to be in my guest room, but there is no telling how long that is going to take.  What I really need is someone to cut all the white pieces for me while I do the stitching.  Any volunteers? :)    Click here for V's how-to tutorial.
The inspiration:


Tuesday, July 13, 2010

Super-Belated Mother's Day


I gave my mom a wonderful gift this past Mother's Day.  The gift of knowing that I am just like her.  The was I did this, however, was by not mailing her actual gift in time for it to get there.  It gets worse, though.  I didn't even have the gift finished!   Worse- it's July & the stuff is still sitting in a corner of my craft room!   I decided I would just bring it with me when I got to see her in August.  Nevertheless, here a a couple of pictures of parts of the present.
This is a home-made potholder made with love (see the little hand-stitched heart!).  I was actually practice making the pinwheel quilt square.  More on THAT subject later.... 

Part 2 of the present is a bunch of herb seeds, a trowel, garden gloves, and these cute little seed markers that I made out of goodwill silverware.   I got the idea from a magazine (either Better Homes & Gardens or Southern Living).  
I just hammered the silverware flat (on the basement floor), and t
he used my metal stamps to imprint the names of the herbs.  Finally, I filled in the stamped letters with sharpie marker, wiping away the excess with a baby wipe.  The stamping part is probably the hardest, because the silverware jumps all over the place as you try to hammer the letters into the metal.  I have to have the boy help me because each time I'd try to hammer one letter, it would bounce.  It kind of looked like the word was stuttering (rrrrosemmmmary) !  But most, of them turned out okay.

Showing off a little

The boy's grandparents gave me an old grey metal bench that used to sit on their back deck.  I decided to spruce it up with some sanding and spray paint.  Wah-lah!

Please ignore any evidence of my extremely poor gardening skills.  They dead-looking leaves that stick up on the side of the bench used to be the beautiful blue hydrangeas the boy got me for our anniversary.  It was a wonderfully sweet gesture, seeing as how they were the exact color as the ones I carried down the aisle in my bouquet.  However, it wasn't long after that when the boy went south for a friend's wedding and I forgot to water everything.  Hence- long-shot at putting them in the ground, even though they were essentially dead.  Perhaps they'll come back next year!   Either way, the bench looks great, right?

Camera Case....

My mother-in-law got me an awesome birthday present-- A new Nikon Coolpix point & shoot camera.  I got it to take on the Paris trip that the boy & I leave for in less that 2 weeks (EEEK!).  I didn't want to lug around my giant camera while I'm being all touristy, so naturally, this rockin' point & shoot was the answer.  I wanted to make a case for the camera & here is what I came up with.
I used a remnant of some Heather Bailey fabric for the pouch and used some batt
ing to make it bump-proof.  I even added a cool magnetic clasp to keep it closed.  See: 

The problem, however, lies in this:  I can't figure out in my head how to do a stinking lining!  I was going to use minkee fabric remnants for the lining to make it even more bump-proof, but I just don't know what I'm doing!  See below for further evidence! Any advice on how to line would be fabulous!


Quick Project

Here's a little dollar store project that I made for my guest room.  All you need is a cute frame, a corkboard, spray paint, and glue.

All you need to do it take the glass out of the frame to spray paint it the color of your choice.  Next, trace the glass onto the corkboard.  Then, cut on the lines you've traced. This was actually really easy with the Dollar Tree ($1) Corkboard, because it was only backed with cardboard.  I was able to cut it cleanly with just scissors!  Next, glue the cork into the frame.  I can't remember if I used hot glue, Elmer's, super glue, or Gorilla Glue.  Either way, I'm sure any other them would work.  Basically, that's it!  Enjoy your mini-corkboard!  

Sunday, April 11, 2010

Look at this...

What is it you ask? Well let me show you....
Still don't know? What if I put this on?


And these?


It's your very own jewelry holder! Basically, it's a frame spray-painted black, with it's original plywood-backed print covered with Amy Butler fabric. Then, I took picture-hanging hooks and screwed them in so I would have something to hang the necklaces on. Love it!

New Niece: Part 4

This is the last Molly post for awhile... unless I see something else I just have to make her. Anyways... check it out!!
It's just a little pillow, but I'm kind of in love with it. I used my Cricut to cut out the fabric/wonder-under letters. Then, I ironed everything on and used a buttonhole stitch to embroider all of the letters down. See here for details!
I'm currently in the process of making another one of these for the hubby & myself. I had a few issues with the sewing machine though, so I had to stop for the day. It usually fixes itself if I leave it alone for awhile. Anyways... it's pretty easy!


New Niece: Part 3


Onesie Love....
These little darlings were made with love for sweet Molly. I used my yudu machine to screen-print the ones with her name/initial on them. The other is some cute fabric I have that I wonder-under'd and then hand stitched to the onesie. Yeah... it was only after I ironed the things on that I figured out that using a sewing machine on a onesie is about nigh impossible without deconstructing. I want to make a cute coordingating skirt or ruffle butt (courtesy of this tutorial by Crap I've Made), but I can't find it at the store anymore. We'll just have to wait and see if anything pops up. I can't wait to see pictures of the little one wearing my handwork!!

New Niece Project # 2

BIBS!

These guys were made using scrap cotton, some chenille for the back, and a little clamper thingy that does snaps. And let me tell you, snaps are HARD!

I made them using this tutorial/pattern that I found on the web. They were very easy... minus the snaps, that is!

For my *sweet* new niece!

Project # 1: A blanket. If you refer to earlier posts, you will see a smallish yellow and aqua quilt that I orignally made when my brother said that he was having a baby. A few months later, he told me it was a going to be a girl. I finished this puppy about a week before sweet little Molly was born. Check it out!
And here are some detail photos for you. The little white part in the middle is actually screenprinted and stuffed like a small pillow. See here!

And here is the corner/back with ribbons and minkee fabric that I accidentally ironed the dots out of. Hopefully it will bounce back after being washed... but who knows?


Saturday, April 3, 2010

The idea from Hades

So, I thought I had a fabulous idea. How neat would it be to have a pretty pegboard in the sewing room to hang supplies on? Great idea, right? In theory, at least. I got the supplies and painted everything only to discover that the pegboard would not fit into the dazzling frame I had picked out. Wouldn't ya know it? Not to mention that I locked myself out of the house after painting and had to wait approximately 3 hours for my husband to come back home. Yuck.

Anyway. Two weeks later we borrowed a jigsaw from hubby's dad to make the dang thing fit. Wouldn't ya know it #2. The blade was so dull that it only jiggled the pegboard. A week later, I took the pegboard and the cardboard from the back of the actual frame to Home Depot for the masterminds (with tools!) there to cut it. After the poor guy made about 5 miniature cuts taking about 20 minutes, we had a match. I took it home, and wouldn't ya know it #3 happened. That joker still wouldn't fit! Sick of it all, I sat with a hammer and a flat-head screwdriver on the basement floor and chiseled until it fit. Then, I Gorilla Glue'd the whole thing into the frame. Here is the unpleasant project in all it's utilitiarian glory.

Here comes Peter Cottontail...


I know this is probably too late for anyone to make anything for this year's Easter holiday, but here are the things I made for myself! The first is just a grapevine wreath with Joann's sparkly Easter eggs glued on. It actually looks really cool from the street. The second is a dollar store adventure. The pot (which I spray painted and covered with vinyl from my cricut), the moss, and the sparkly eggs (which are picks with the sticks broke off) came from the dollar tree. Add those to a styrofoam ball and a wooden dowel and you get an Easter topiary! It wasn't my idea.... (things rarely are!), but I can't remember which blog I got it from. Sorry! If you want to make one, all you need is the above listed things, a second styrofoam block for the pot, a hot glue gun, and a lot of patience. For some reason, moss does not like to stick with hot glue. Let me know if you can think of a better idea!

Habits

I have this bad habit. I do a ton of craft projects, but I don't post a single one. Then, I do all of them at once. I guess that's probably why I'll never be one of those professional bloggers that people check out every day. Oh well... here's one of my latest adventures. I made this for my co-teacher's little girl on her 5th birthday. The "home" is fabric that I wonder-undered to the little drawstring bag and then topstictched for the pink outlines. The doorknob is a button and the window is a bit of thick plastic from some sheets I bought. The people were made out of little wooden spools and balls that I got at Joann's. I painted them, used a sharpie to outline things, and then super-glued the heads on. Her mom said it was her favorite present of the day!!
Here's a close-up of the little people.
The idea came from a blog called Everyday Chaos. Check out what that blogger did here.

Friday, February 12, 2010

Should I keep/give/sell?

What to do with these little clippies? I saw some for sale on the blog MADE, and knew that I could make them myself. So I did.
They're really cute, but I'm not sure just how far I can go with wearing them because they are for little girls. The cactus rocks & the heart is great for Valentine's. What do you think?

Quickie Post

I decided my plain canvas school bag needed a bit of decoration. Here's what I came up with.
It's not I just used some scrap fabric for a decorative top band and my Yudu to put my name & a bird on it. It was supposed to have a lot more than this, but wouldn't you know it? This canvas joker broke my sewing machine needle, and my back up needle! All within 5 inches of each other. I ended up hand-stitching the top band just so I could call it finished. There were supposed to be pockets and everything, but alas. I'll just have to go to JoAnn's soon. (Like I needed an excuse!)

I'm getting really good ......


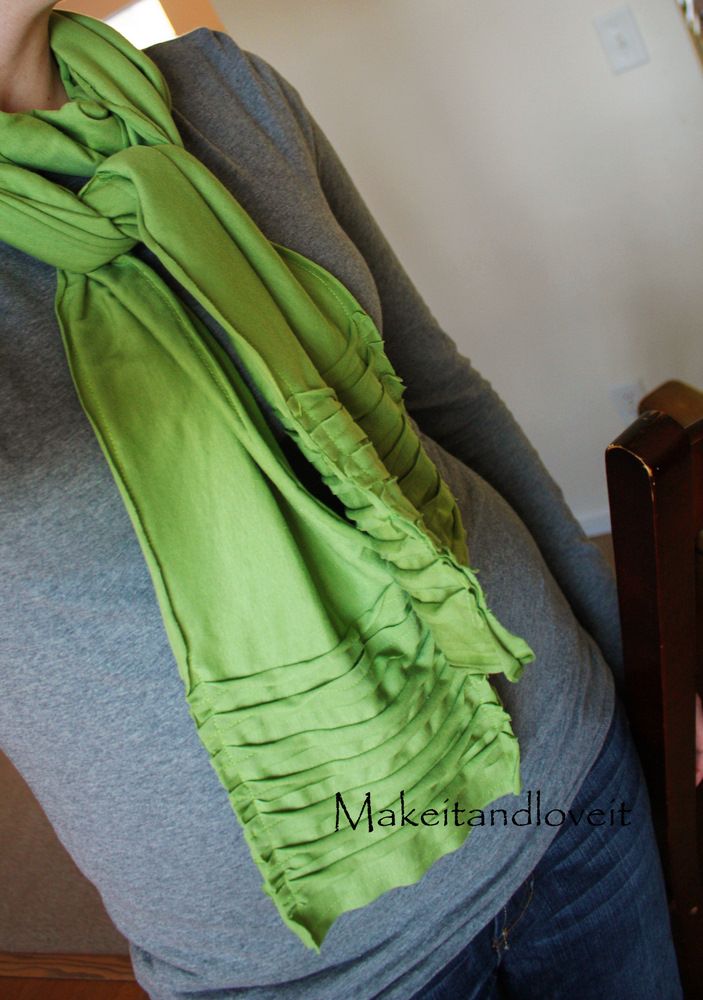
I'm getting really good at stealing other people's ideas. I mean, like exactly. Here is my version of an awesome jersey scarf: <---- ----

And here is the one from Make It and Love It. The only difference is theirs is significantly longer. I think mine would've looked better longer, but I didn't want to buy the extra fabric. What do you think? The tutorial to do it yourself is at Make It & Love It blog, or you can just click here.

I told ya...


Here's my version.... I'd say it's probably 99.99% the same as the one featured earlier. I love it... and so does the hubby. He keeps putting it in the middle of the living room couch... even though the living room furniture is moss green. :)

Check out this snow...


There's so stinkin' much snow, that I haven't been to work in a week. And more snow is predicted for Monday. This stuff is getting ridiculous! Check out a couple of neat photos I've snapped during my time off. And check out these icicles!! They're deadly!

Luckily, we've had electricity during this whole blizzard adventure, and do you know what that means? I've been getting some serious crafting done. Posts to come!

Saturday, January 30, 2010

I must make this....


I even bought the exact same fabric so I can replicate it as closely as possible.
The tutorial for it is here.

Love is in the air...


Oh, how I love valentine's day! The problem is, I don't have a single v-day related decoration in my house. At least, that was the case last weekend. So, I decided to take matters into my own hands. I was browsing through my collection of blogs that I follow & I found this really neat rag-wreath. Actually, with the colors they chose, it was kind of ugly to me, but I saw the potential. If I figure out where I saw it, I'll post a link

Anywho... I decided to make it valentines-y by making a pink/red/white one in the shape of a heart. However, Joann's did not have heart-shaped wreath forms. Nevertheless, I was determined that my wreath be heart-shaped, so I went for the wire-hanger. The bending process wasn't complicated, but it must have looked so because my sister-in-law kept telling me I should've bought one, and that mine looked stupid. Oh ye of little faith! After I was finished, she took it all back!

The fabric is just strips I cut with pinking shears and tied in a knot around the wire. The "love" block was a 10cent find at a Michaels after-Christmas sale! It was super-easy & is too cute. Try it out for yourself!

Helping Out a Friend


So basically, I have a obsession with aprons. In my own kitchen, I have 4. In my craft room, there's another. This one here is for my co-teacher's daughter. She is turning 5 in a couple weeks and having a chef party. I whipped it up when I woke up waaaay too early one morning before school. I didn't have a pattern, so i just made it up as I went, using grossgrain ribbon for the strings. The pocket & ruffle used to be scrubs when I worked at a daycare. I think it's pretty dang cute!

Sunday, January 24, 2010

A couple of friends


I made these stuffed toys for my cousins in Indiana. I'd seen the owls all over craft blogs and decided to try my hand at them. The little doll came from a free Martha Stewart template. You can get your own here.

It's a Banana-pus


And guess what? It loves pancakes!! Have you ever seen the Dennys commercial with the Nannerpus? Check it out on youtube here. It's actually really funny. Andrew loved it so much, that I made him his very own stuffed version for Christmas!

Snow Days


Here are a couple of photos of me & the boy during the recent snows. Fun, right? Maryland is quite a step colder than ole Tejas.


We got about 14 inches in a 24 hour span. I loved it... at least until I took my first ice-spill last week. It was in a deceptive puddle with ice at the bottom in a Wendy's parking lot. The bruise looks disgusting, but it makes for a pretty funny story!